こんにちは、あろっちです。
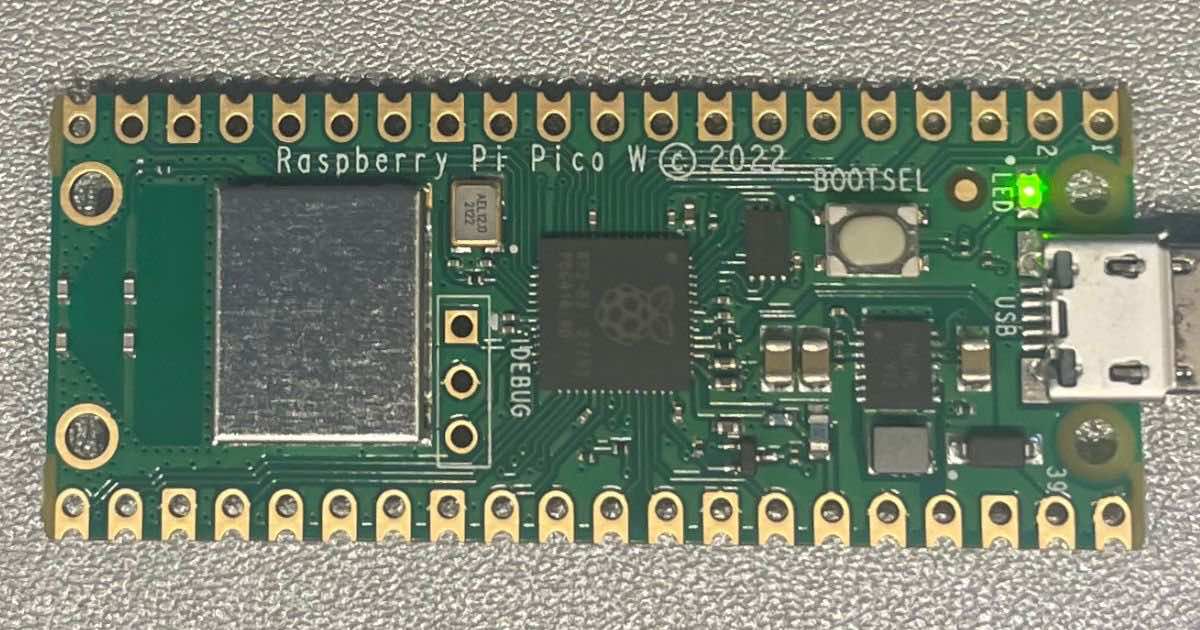
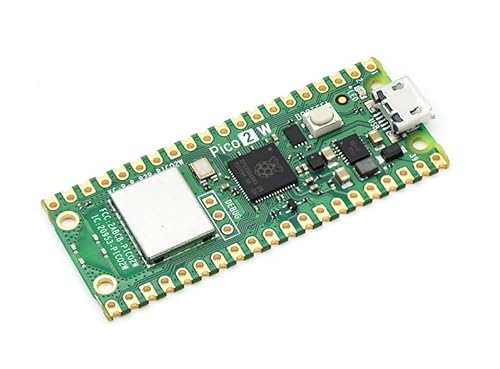
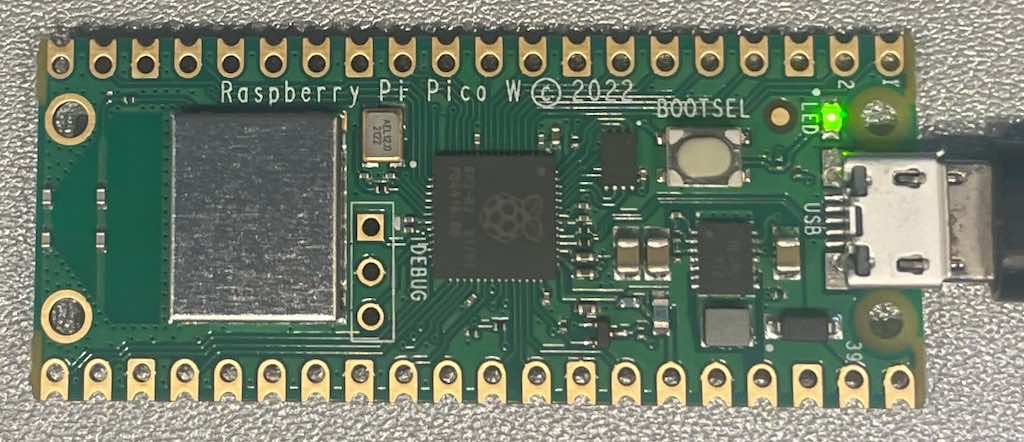
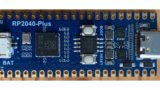
Raspberry Pi Pico WとRaspberry Pi Pico 2 Wを入手したのでArduinoとMicroPythonで試してみたいと思います。
本記事に掲載のプログラムはRaspberry Pico 2 Wでも動作することを確認しました。

参考URL:
Raspberry Pico W

Raspberry Pi Pico 2 W

デバッガーの使用方法は次の記事を参考にしてください。
Arduino IDE以外の開発環境についての記事はこちら


特徴
※1 WPA3は通信を暗号化するためのセキュリティプロトコルです。
※2 SoftAP、Stationモードについて
SoftAP(ソフトウェアアクセスポイント)
→サーバー(ルーター)として振る舞うモードです。
平たく言うと単独でWi-Fiを動作させることができるモードです。
最大4台までクライアントを接続できます。
Station
→クライアントとして動作するモードです。
平たく言うと、他のWi-Fi(自宅のルーターなど)に接続して動作するモードです。
主な仕様
| 項目 | Raspberry Pi Pico W | Raspberry Pi Pico 2 W |
|---|---|---|
| MCU | RP2040 デュアルコア ARM Cortex M0+プロセッサ 133 MHz | RP2350 デュアルコア Cortex-M33 or RISC-V Hazard3 150MHz |
| SRAM | 264kB | 520kB |
| フラッシュ メモリ | 2MB | 4MB |
| GPIO | 26 (ピン配列はRaspberry Pi Pico互換) | 26 (ピン配列はRaspberry Pi Pico互換) |
RP2040搭載ボードまとめ記事(参考サイト)

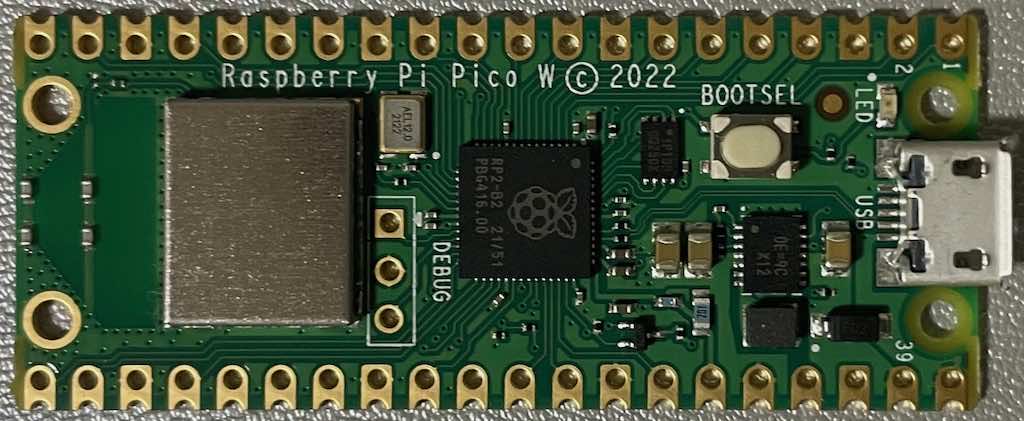
ピン配列
Raspberry Pi Pico W

Raspberry Pi Pico 2 W

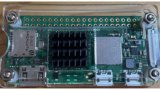
ギャラリー
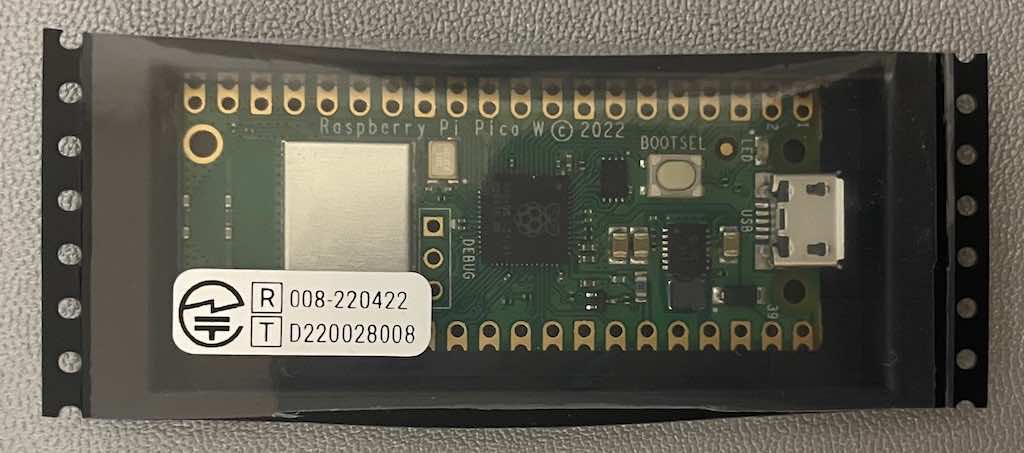
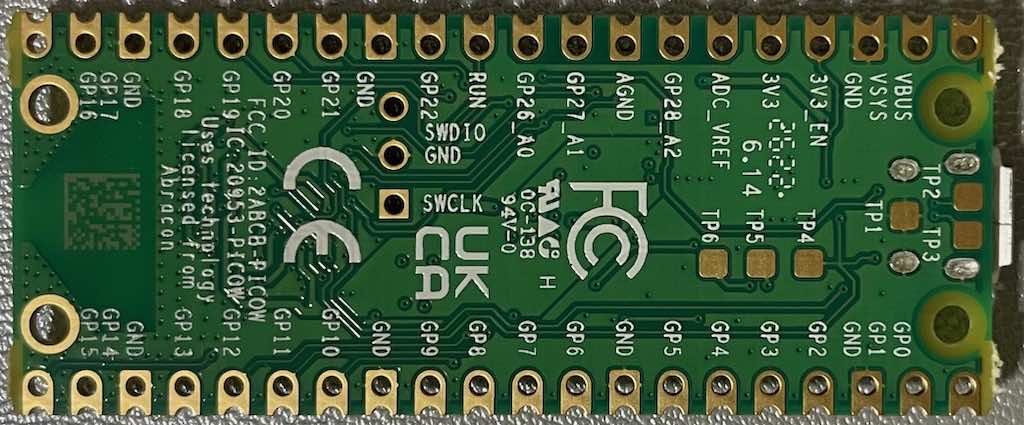
技適マークは梱包材に貼られています。保管しておきましょう。
表
裏
ピンヘッダー実装後

Raspberry Pi Pico WとRaspberry Pi Pico 2 Wを並べてみました。

USBマスストレージモード
以下の記事を参考にしてください。

Arduino IDEの設定
- Arduino IDEにボードを追加
※実施済みの場合、この手順は不要です。
事前にRaspberry Pi Pico/RP2040/RP2350ボード(Arduino-Pico)を追加します。
追加方法は、以下の記事をご覧ください。

- Raspberry Pi Pico/RP2040/RP2350ボード(Arduino-Pico)のインストール
[ツール] > [ボード] > [ボードマネージャ]をクリックし、検索ボックスに「rp2040」と入力し、[Raspberry Pi Pico/RP2040]ボードをインストールします。
- ボードの選択
[ツール] > [ボード] > [Raspberry Pi RP2040(Ver)※] > [Raspberry Pi Pico W]を選択します。
Raspberry Pi Pico 2 Wの場合は、[Raspberry Pi Pico 2W]を選択します。
※(Ver)の表示はArduino IDE 1系のみ
- シリアルポートの選択
[ツール] > [シリアルポート]からRaspberry Pi Pico W / Pico 2 Wが接続されているシリアルポートを選択します。
Chromebookなどシリアルポートから書き込みできない環境の場合、手動でスケッチを書き込みできます。
サンプルプログラム (Arduinoスケッチ)
スケッチ例
Arduino IDEのスケッチ例をいくつか試してみます。
SPI接続のLCDに関しましてLovyanGFX定義例の記事を書きました。
Blink
ファイル > スケッチ例 > 01.Basics > Blinkを開きRaspberry Pi Pico Wに書き込みます。
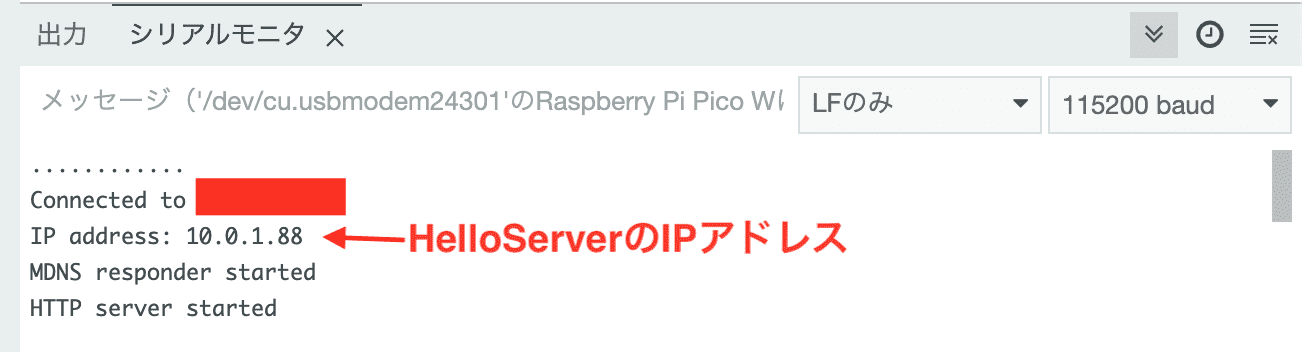
HelloServer
ファイル > スケッチ例 > WebServer > HelloServer
以下の箇所(your-ssid、your-password)を接続先Wi-FiのSSIDとパスワードに書き換えてスケッチを書き込みます。
#ifndef STASSID
#define STASSID "your-ssid"
#define STAPSK "your-password"
#endif
シリアルモニターを開くとHelloServerのIPアドレスが確認できます。
※確認できない場合はRaspberry Pi Pico Wを再起動してください。
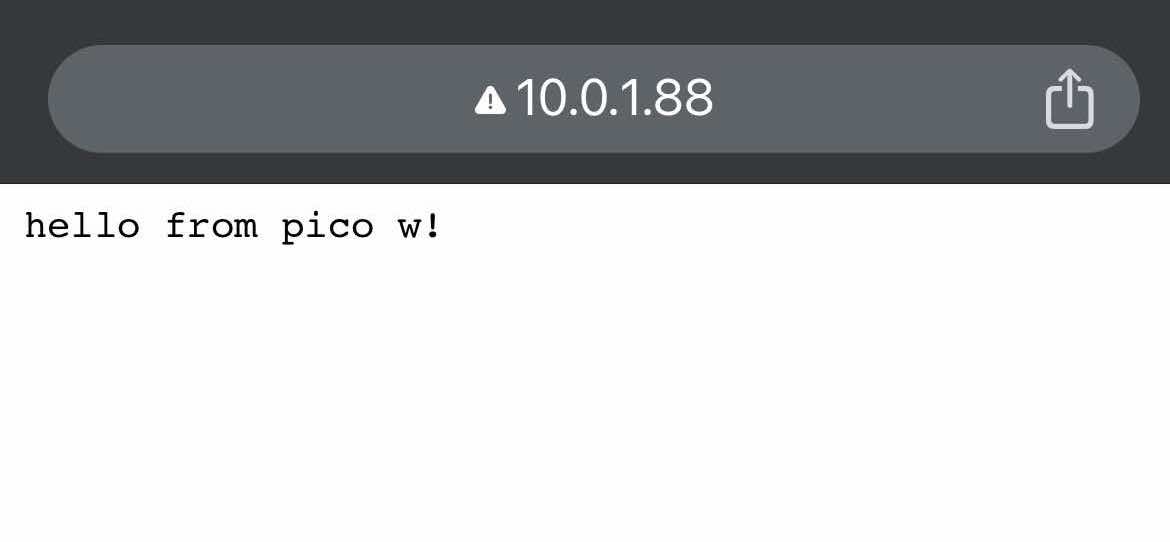
接続してみる
ブラウザからIPアドレスを入力します。
http://IPアドレス
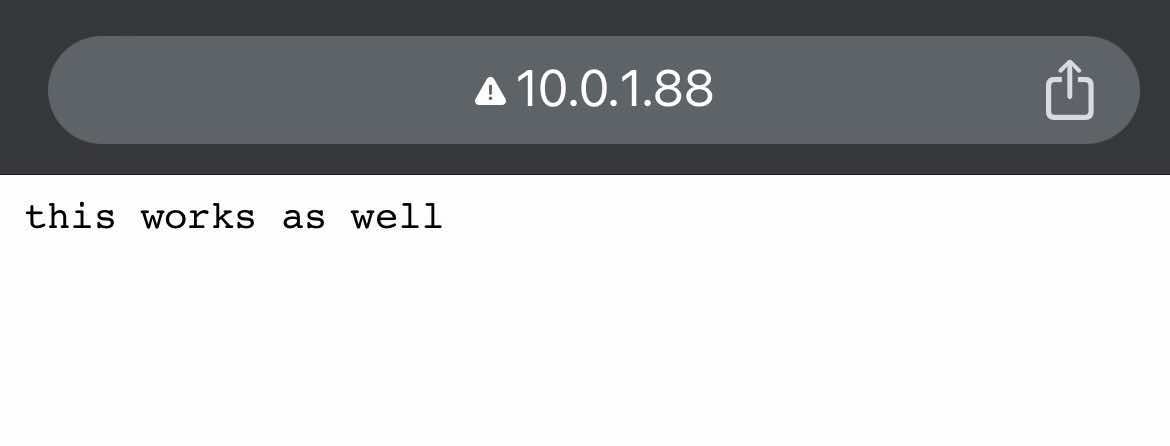
http://IPアドレス/inline
http://IPアドレス/適当な文字列
以下は文字列の指定例: http://IPアドレス/test?p=aloseed

HelloServer AP(アクセスポイント)版
AP(アクセスポイント)の例としてスケッチ例のHelloServerを改修してアクセスポイント版を作成しました。
接続先Wi-Fi不要で単独で動きます。
以下のWi-Fi(SSID)にスマホなどから接続してください。
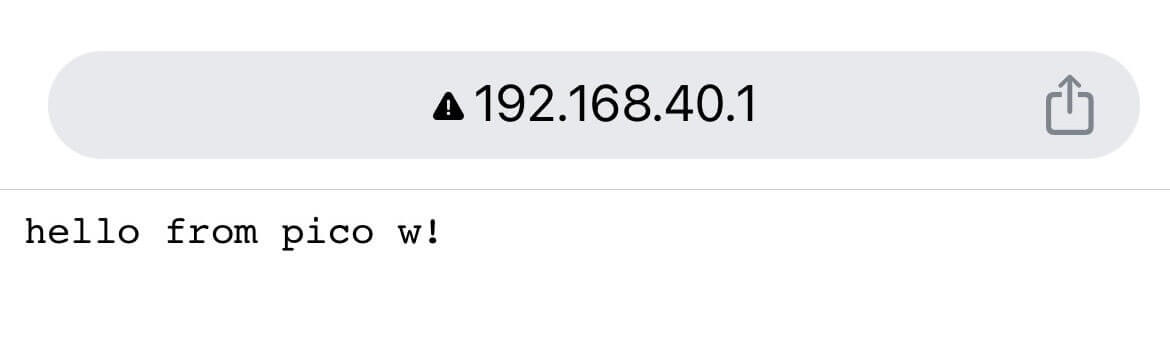
| ネットワーク名 (SSID) | PicoW |
| パスワード | 0123456789 |
| IPアドレスおよびデフォルトゲートウェイ | 192.168.40.1 |
| サブネットマスク | 255.255.255.0 |
接続後、ブラウザから「http://192.168.40.1/」にアクセスするとHelloServerの画面が表示されます。
#include <WiFi.h>
#include <WiFiClient.h>
#include <WebServer.h>
#include <LEAmDNS.h>

#ifndef STASSID
#define STASSID "PicoW"
#define STAPSK "0123456789"
#endif

const char* ssid = STASSID;
const char* password = STAPSK;

const IPAddress ip(192, 168, 40, 1);
const IPAddress subnet(255, 255, 255, 0);

WebServer server(80);

const int led = LED_BUILTIN;

void handleRoot() {
  digitalWrite(led, 1);
  server.send(200, "text/plain", "hello from pico w!\r\n");
  digitalWrite(led, 0);
}

void handleNotFound() {
  digitalWrite(led, 1);
  String message = "File Not Found\n\n";
  message += "URI: ";
  message += server.uri();
  message += "\nMethod: ";
  message += (server.method() == HTTP_GET) ? "GET" : "POST";
  message += "\nArguments: ";
  message += server.args();
  message += "\n";
  for (uint8_t i = 0; i < server.args(); i++) {
    message += " " + server.argName(i) + ": " + server.arg(i) + "\n";
  }
  server.send(404, "text/plain", message);
  digitalWrite(led, 0);
}

void setup(void) {
  pinMode(led, OUTPUT);
  digitalWrite(led, 0);
  Serial.begin(115200);

  WiFi.mode(WIFI_AP);
  WiFi.softAPConfig(ip, ip, subnet);
  WiFi.begin(ssid, password);

  Serial.println("");
  Serial.print("Connected to ");
  Serial.println(ssid);
  Serial.print("IP address: ");
  Serial.println(WiFi.localIP());

  if (MDNS.begin("picow")) {
    Serial.println("MDNS responder started");
  }

  server.on("/", handleRoot);

  server.on("/inline", []() {
    server.send(200, "text/plain", "this works as well");
  });

  server.on("/gif", []() {
    static const uint8_t gif[] = {
      0x47, 0x49, 0x46, 0x38, 0x37, 0x61, 0x10, 0x00, 0x10, 0x00, 0x80, 0x01,
      0x00, 0x00, 0x00, 0x00, 0xff, 0xff, 0xff, 0x2c, 0x00, 0x00, 0x00, 0x00,
      0x10, 0x00, 0x10, 0x00, 0x00, 0x02, 0x19, 0x8c, 0x8f, 0xa9, 0xcb, 0x9d,
      0x00, 0x5f, 0x74, 0xb4, 0x56, 0xb0, 0xb0, 0xd2, 0xf2, 0x35, 0x1e, 0x4c,
      0x0c, 0x24, 0x5a, 0xe6, 0x89, 0xa6, 0x4d, 0x01, 0x00, 0x3b
    };
    char gif_colored[sizeof(gif)];
    memcpy_P(gif_colored, gif, sizeof(gif));
    // Set the background to a random set of colors
    gif_colored[16] = millis() % 256;
    gif_colored[17] = millis() % 256;
    gif_colored[18] = millis() % 256;
    server.send(200, "image/gif", gif_colored, sizeof(gif_colored));
  });

  server.onNotFound(handleNotFound);

  /////////////////////////////////////////////////////////
  // Hook examples

  server.addHook([](const String & method, const String & url, WiFiClient * client, WebServer::ContentTypeFunction contentType) {
    (void)method;       // GET, PUT, ...
    (void)url;          // example: /root/myfile.html
    (void)client;       // the webserver tcp client connection
    (void)contentType;  // contentType(".html") => "text/html"
    Serial.printf("A useless web hook has passed\n");
    return WebServer::CLIENT_REQUEST_CAN_CONTINUE;
  });

  server.addHook([](const String&, const String & url, WiFiClient*, WebServer::ContentTypeFunction) {
    if (url.startsWith("/fail")) {
      Serial.printf("An always failing web hook has been triggered\n");
      return WebServer::CLIENT_MUST_STOP;
    }
    return WebServer::CLIENT_REQUEST_CAN_CONTINUE;
  });

  server.addHook([](const String&, const String & url, WiFiClient * client, WebServer::ContentTypeFunction) {
    if (url.startsWith("/dump")) {
      Serial.printf("The dumper web hook is on the run\n");

      // Here the request is not interpreted, so we cannot for sure
      // swallow the exact amount matching the full request+content,
      // hence the tcp connection cannot be handled anymore by the
      auto last = millis();
      while ((millis() - last) < 500) {
        char buf[32];
        size_t len = client->read((uint8_t*)buf, sizeof(buf));
        if (len > 0) {
          Serial.printf("(<%d> chars)", (int)len);
          Serial.write(buf, len);
          last = millis();
        }
      }
      // Two choices: return MUST STOP and webserver will close it
      //                       (we already have the example with '/fail' hook)
      // or                  IS GIVEN and webserver will forget it
      // trying with IS GIVEN and storing it on a dumb WiFiClient.
      // check the client connection: it should not immediately be closed
      // (make another '/dump' one to close the first)
      Serial.printf("\nTelling server to forget this connection\n");
      static WiFiClient forgetme = *client;  // stop previous one if present and transfer client refcounter
      return WebServer::CLIENT_IS_GIVEN;
    }
    return WebServer::CLIENT_REQUEST_CAN_CONTINUE;
  });

  // Hook examples
  /////////////////////////////////////////////////////////

  server.begin();
  Serial.println("HTTP server started");
}

void loop(void) {
  server.handleClient();
  MDNS.update();
}
OLEDクロック
OLED(I2C)を使った時計です。
Raspberry Pi Pico Wということで、Wi-Fiを通してNTPで時刻合わせを行うように実装してみました。
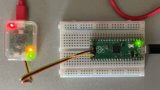
上の動画では自作のボードを使っていますが、下の動画のようにブレッドボードで製作できます。
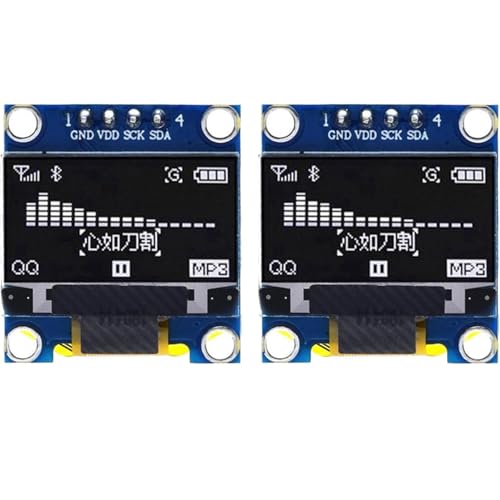
OLEDの配線について
| OLED(I2C) | ピン/GPIO | 備考 |
|---|---|---|
| GND | GND | |
| VCC | 3.3V | |
| SCL | 5 | I2C SCL デフォルト |
| SDA | 4 | I2C SDA デフォルト |
透明OLEDも使えました。

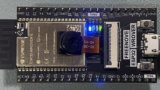
自作のプリント基板でも実装してみました。
このプリント基板の記事を書きました。ぜひご覧ください。

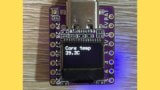
Raspberry Pi Pico 2 Wと2.42インチOLEDを使って表示してみました。こちらも自作のプリント基板を使っています。

画面が大きいと見やすいですね。

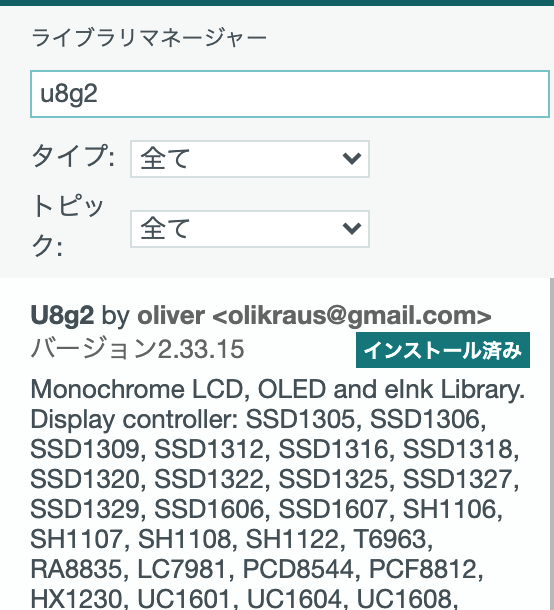
スケッチ
Arduino IDEのライブラリマネージャーから検索してインストールできます。
#include <WiFi.h>
#include <Wire.h>
#include <U8g2lib.h>

// WiFi接続情報
const char *ssid = "your-ssid";
const char *password = "your-password";

// 曜日表示文字
const char *weekChar[7] = { "日", "月", "火", "水", "木", "金", "土" };

// U8g2コンストラクタ
U8G2_SSD1306_128X64_NONAME_F_HW_I2C u8g2(U8G2_R0, /* reset=*/U8X8_PIN_NONE);

// NTPによる時刻同期関数
bool setClock() {
  NTP.begin("ntp.nict.jp", "time.google.com");
  return NTP.waitSet();
}

void setup() {
  Serial.begin(115200);

  Wire.begin();
  Wire.setClock(400000);

  u8g2.begin();  // OLED初期化
  u8g2.setContrast(1);

  u8g2.clearBuffer();
  u8g2.setFont(u8g2_font_crox1hb_tf);
  u8g2.drawStr(0, 17, "WiFi connecting...");
  u8g2.sendBuffer();

  // WiFi接続
  WiFi.begin(ssid, password);
  if (WiFi.status() != WL_CONNECTED) {
    u8g2.clearBuffer();
    u8g2.drawStr(0, 17, "WiFi Connection failed");
    u8g2.sendBuffer();

    // Serial.println("WiFi Connection failed");

    for (;;)
      delay(1000);
  }

  // NTP時刻同期
  if (!setClock()) {
    // 時刻取得失敗時は停止
    u8g2.clearBuffer();
    u8g2.drawStr(0, 17, "Failed to obtain time");
    u8g2.sendBuffer();

    // Serial.println("Failed to obtain time");
    for (;;)
      delay(1000);
  }

  // WiFi切断
  WiFi.disconnect(true);

  // 日本標準時をセット
  setenv("TZ", "JST-9", 1);
  tzset();
}

void loop() {
  static time_t now;
  static struct tm *timeinfo;
  static int lastSec = -1;
  static char buf[20];

  // 現在時を取得
  time(&now);
  timeinfo = localtime(&now);

  // 時刻が変わっているか判定
  if (lastSec != timeinfo->tm_sec) {
    lastSec = timeinfo->tm_sec;
    // Serial.print(asctime(timeinfo));

    // 時刻が変わった時に描画する
    u8g2.clearBuffer();
    // 時計用フォントをセット
    u8g2.setFont(u8g2_font_crox5h_tn);
    // 時分秒の描画
    sprintf(buf, "%2d", timeinfo->tm_hour);
    u8g2.drawStr(0, 17, buf);
    sprintf(buf, "%02d", timeinfo->tm_min);
    u8g2.drawStr(45, 17, buf);
    sprintf(buf, "%02d", timeinfo->tm_sec);
    u8g2.drawStr(87, 17, buf);

    // 年月日の描画
    sprintf(buf, "%4d", timeinfo->tm_year + 1900);
    u8g2.drawStr(0, 40, buf);
    sprintf(buf, "%2d", timeinfo->tm_mon + 1);
    u8g2.drawStr(0, 64, buf);
    sprintf(buf, "%2d", timeinfo->tm_mday);
    u8g2.drawStr(48, 64, buf);

    // 曜日()の描画
    u8g2.setFont(u8g2_font_crox4h_tf);
    u8g2.drawStr(96, 60, "(");
    u8g2.drawStr(122, 60, ")");

    // 年月日時分秒の描画
    // 日本語フォントをセット
    u8g2.setFont(u8g2_font_b16_b_t_japanese1);
    u8g2.drawUTF8(28, 15, "時");
    u8g2.drawUTF8(71, 15, "分");
    u8g2.drawUTF8(113, 15, "秒");
    u8g2.drawUTF8(54, 38, "年");
    u8g2.drawUTF8(28, 62, "月");
    u8g2.drawUTF8(76, 62, "日");
    u8g2.drawUTF8(104, 62, weekChar[timeinfo->tm_wday]);

    u8g2.sendBuffer();
  }

  yield();
}
your-ssid、your-passwordを接続先Wi-Fi(ご自宅のルーターなど)のSSIDとパスワードに書き換えてスケッチを書き込んでください。
ニュースクライアント (ニュースリーダー)
ニュースサイト(Yahoo!ニュースなど)のRSSを読み取り、見出しをシリアルモニターに表示します。
スケッチ
#include <WiFi.h>
#include <HTTPClient.h>
// WiFiアクセスポイント情報
#define STASSID "your-ssid"
#define STAPSK "your-password"
// WiFiアクセスポイント情報2 (WiFi接続を複数アクセスポイントに対して試みる場合に使用します。)
// #define STASSID2 "your-ssid"
// #define STAPSK2 "your-password"
const char *ssid = STASSID;
const char *pass = STAPSK;
#ifdef STASSID2
const char *ssid2 = STASSID2;
const char *pass2 = STAPSK2;
#endif
WiFiMulti WiFiMulti;
//Yahooニュース
const char *url = "https://news.yahoo.co.jp/rss/topics/top-picks.xml";
//NHKニュース
// const char *url = "https://www3.nhk.or.jp/rss/news/cat0.xml";
//ITmedia
// const char *url = "https://rss.itmedia.co.jp/rss/2.0/news_bursts.xml";
//Googleニュース
// const char *url = "https://news.google.com/rss/search?q=Japan&hl=ja&gl=JP&ceid=JP:ja";
// ニュースの見出しを格納する動的配列
std::vector<String> headlines;
// headlinesの更新フラグ
volatile bool isUpdated = false;
// WiFi接続のタイムアウト時間 (ミリ秒)
const uint32_t timeout = 20000; // 20秒
// RSS読み込みの間隔 (ミリ秒)
const uint32_t delayInterval = 10 * 60 * 1000; // 10分(600000ミリ秒)
void setup() {
Serial.begin(115200);
Serial.println();
Serial.println();
Serial.println();
for (uint8_t t = 4; t > 0; t--) {
Serial.printf("[SETUP] WAIT %d...\n", t);
Serial.flush();
delay(1000);
}
WiFi.mode(WIFI_STA);
WiFiMulti.addAP(ssid, pass);
#ifdef STASSID2
// 2つ目のアクセスポイント情報が定義されていればWiFi接続先としてWiFiMultiに追加
WiFiMulti.addAP(ssid2, pass2);
#endif
}
// HTMLエスケープ文字をデコードする関数
void decodeHtmlEntities(String &text) {
text.replace("<", "<");
text.replace(">", ">");
text.replace("'", "'");
text.replace(""", "\"");
text.replace("&", "&");
text.replace(" ", " ");
}
// メインループ0 - ニュースの取得(通信処理)
void loop() {
// ニュースの文字列として読み取るタグを定義 (<title>...</title> の部分)
const static String startTag = "<title>";
const static String endTag = "</title>";
if ((WiFiMulti.run(timeout) == WL_CONNECTED)) {
HTTPClient https;
https.setInsecure();
if (https.begin(url)) {
int httpCode = https.GET();
if (httpCode == HTTP_CODE_OK) {
WiFiClient *stream = https.getStreamPtr();
String line;
std::vector<String> lines;
while (stream->available()) {
char c = stream->read();
line += c;
if (line.endsWith(startTag)) {
line = ""; // タイトル内容を収集するためにリセット
} else if (line.endsWith(endTag)) {
String title = line.substring(0, line.length() - endTag.length());
// HTMLエスケープ文字を変換
decodeHtmlEntities(title);
lines.push_back(title);
line = ""; // 次のデータを処理するためにリセット
}
if (line.length() > 1024) {
// 安全対策(メモリリーク防止)として、1行が長すぎる場合は最後のstartTag.length()分を保持してリセット
line = line.substring(line.length() - startTag.length());
}
}
// 新しいタイトルリストで更新
headlines = std::move(lines);
isUpdated = true;
} else {
Serial.printf("[HTTPS] GET... failed, error: %s\n", https.errorToString(httpCode).c_str());
}
// リソースを解放
https.end();
} else {
Serial.println("[HTTPS] Unable to connect");
}
} else {
Serial.println("[WIFI] Failed to connect to WiFi");
// WiFi接続に失敗した場合は少し待機して再接続を試みる
for (uint8_t t = 4; t > 0; t--) {
Serial.printf("[WIFI] WAIT %d...\n", t);
Serial.flush();
delay(1000);
}
return;
}
WiFi.disconnect(true);
Serial.println("Wait " + String(delayInterval / 1000) + " seconds before next round...");
Serial.printf("Free heap: %d\n", rp2040.getFreeHeap());
delay(delayInterval);
}
// メインループ1 - ニュースの表示
void loop1() {
if (isUpdated) {
isUpdated = false;
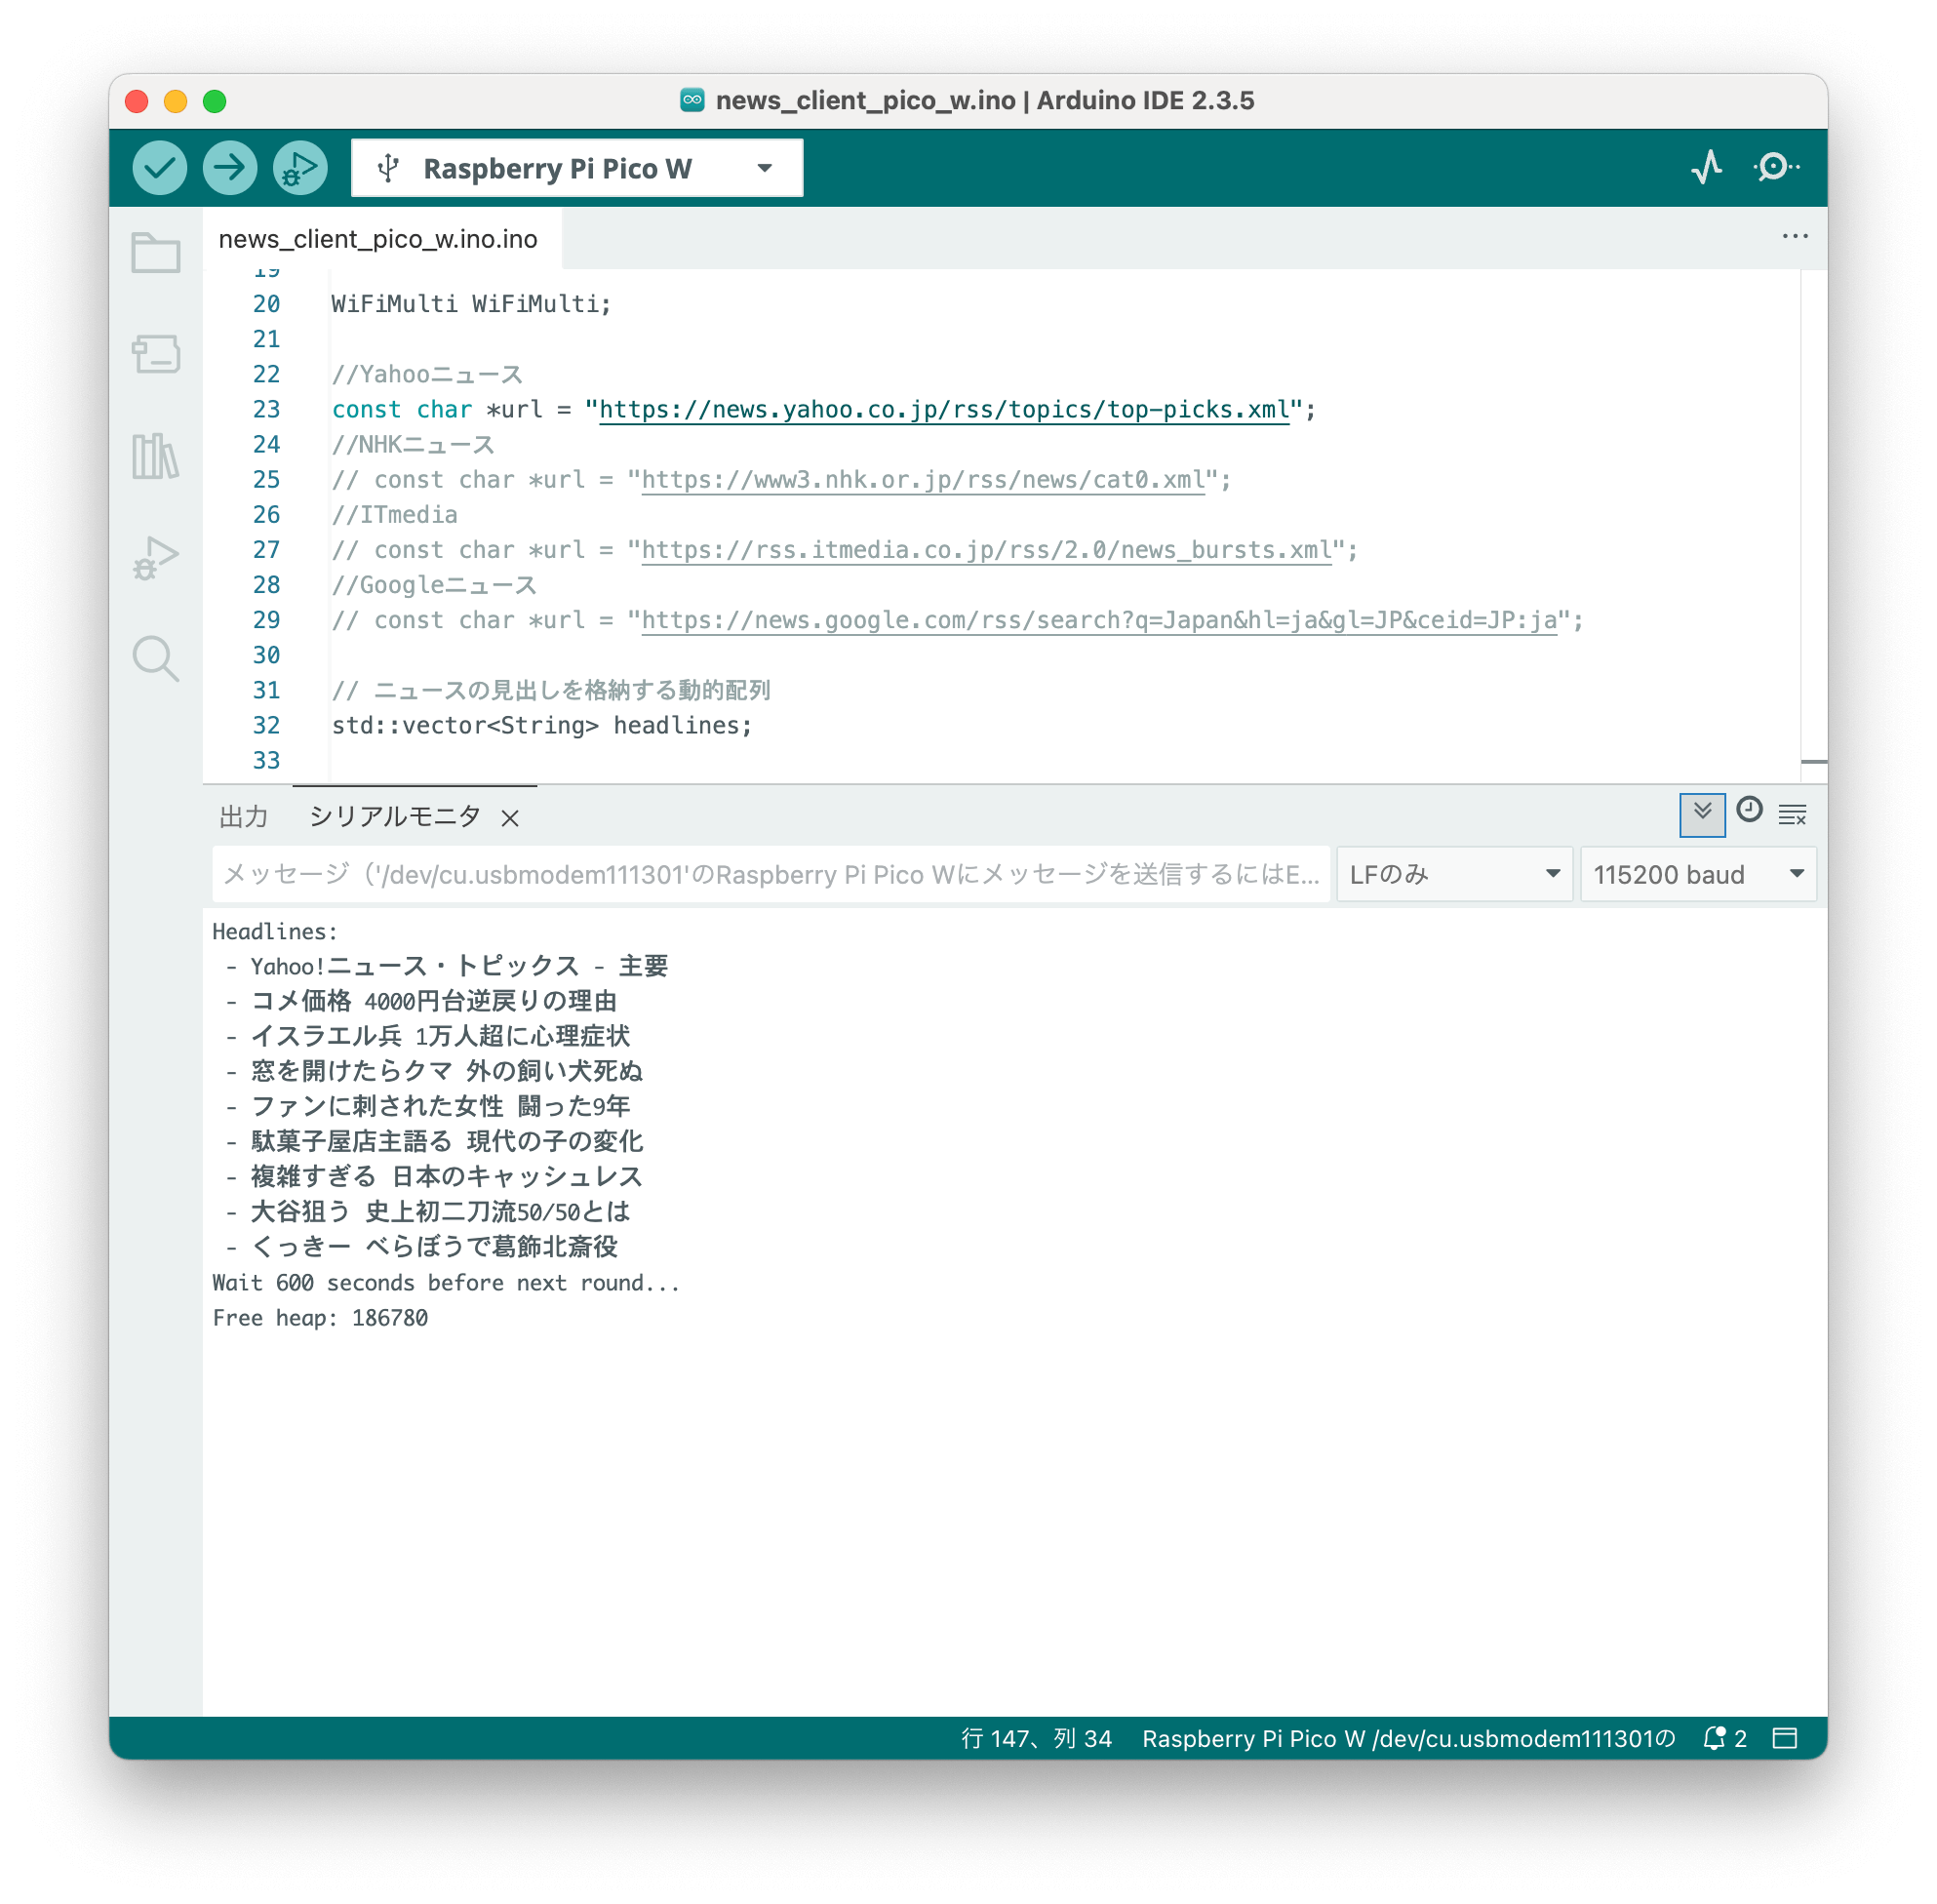
Serial.println("Headlines:");
for (const auto& headline : headlines) {
Serial.println(" - " + headline);
}
}
}10分間隔でニュースを取得し、シリアルモニターに表示します。この間隔はdelayIntervalの値で調整できます。
ニュースサイトのURLはconst char *urlで定義します。yahoo!ニュース以外の主要ニュースサイトのurl定義をコメント化していますので、お好みでご使用ください。
your-ssid、your-passwordを接続先Wi-Fi(ご自宅のルーターなど)のSSIDとパスワードに書き換えてスケッチを書き込んでください。
ニュース電光掲示板
ニュースサイト(Yahoo!ニュースなど)のRSSを読み取り、見出しをLEDマトリクス(MAX7219)にスクロール表示します。
低解像(8×8 4連)のLEDマトリクスに日本語を表示させたかったので、フォントに美咲ゴシック第2フォントを使っています。

AliExpressもチェックしてみてください。


LEDマトリクス(MAX7219)の配線について
| マトリクス (MAX7219) | Pico W/Pico 2 W | 備考 |
|---|---|---|
| VCC | VSYS | |
| GND | GND | |
| DIN | 19 | SPI MOSI (TX) デフォルト |
| CS | 17 | |
| CLK | 18 | SPI SCK デフォルト |
スケッチ
misaki以外は、ライブラリマネージャーからインストールできます。
misaki
Arduino環境向けの「美咲ゴシック第2フォント」を収録した日本語フォントライブラリです。
以下の記事を参考にArduino環境にインストールしてください。
#include <WiFi.h>
#include <HTTPClient.h>
#include <MD_MAX72xx.h>
#include <MD_Parola.h>
#include <misaki.hpp>
// MAX7219の設定
#define HARDWARE_TYPE MD_MAX72XX::FC16_HW
#define MAX_DEVICES 4
// CSピンの設定
#define CS_PIN 17
// スクロールする文字列の最大長
#define MAX_LENGTH 256
// スクロールする文字列をMD_Parolaに登録するための変数
char messageCode[MAX_LENGTH];
// MD_Parolaに登録するフォントデータを格納するための配列
uint8_t rotatedFontData[9 * MAX_LENGTH]; // 90度回転したフォントデータを格納する領域
// MD_Parolaオブジェクトの作成
MD_Parola parola = MD_Parola(HARDWARE_TYPE, CS_PIN, MAX_DEVICES);
// WiFiアクセスポイント情報
#define STASSID "your-ssid"
#define STAPSK "your-password"
// WiFiアクセスポイント情報2 (WiFi接続を複数アクセスポイントに対して試みる場合に使用します。)
// #define STASSID2 "your-ssid"
// #define STAPSK2 "your-password"
const char *ssid = STASSID;
const char *pass = STAPSK;
#ifdef STASSID2
const char *ssid2 = STASSID2;
const char *pass2 = STAPSK2;
#endif
WiFiMulti WiFiMulti;
//Yahooニュース
const char *url = "https://news.yahoo.co.jp/rss/topics/top-picks.xml";
//NHKニュース
// const char *url = "https://www3.nhk.or.jp/rss/news/cat0.xml";
//ITmedia
// const char *url = "https://rss.itmedia.co.jp/rss/2.0/news_bursts.xml";
//Googleニュース
// const char *url = "https://news.google.com/rss/search?q=Japan&hl=ja&gl=JP&ceid=JP:ja";
// ニュースの見出しを格納する動的配列
std::vector<String> headlines;
// headlinesの更新フラグ
volatile bool isUpdated = false;
// WiFi接続のタイムアウト時間 (ミリ秒)
const uint32_t timeout = 20000; // 20秒
// RSS読み込みの間隔 (ミリ秒)
const uint32_t delayInterval = 10 * 60 * 1000; // 10分(600000ミリ秒)
// MAX72xxに表示するメッセージ関連の変数
int messageIndex = 0; // 現在表示しているメッセージのインデックス
size_t totalMessages = 0; // メッセージの総数
const int scrollSpeed = 50; // スクロール速度 (小さいほど速い)
// Parolaに指定した文字列(text)のフォントデータを登録する関数
void addFontToParola(const char* text) {
uint16_t charIndex = 1; // 文字列の先頭を1として順番にインデックスを割り当てる
uint8_t charWidth;
while (*text && charIndex < MAX_LENGTH) {
// UTF-8をUnicodeに変換し、文字幅を取得
uint16_t unicode = utf8ToUnicode(text, &charWidth);
// フォントデータを取得
const uint8_t* fontData = getFontData(unicode);
// フォントデータを90度回転して格納
// フォントデータの1バイト目は文字幅を格納する
rotatedFontData[(charIndex - 1) * 9] = charWidth;
// フォントデータの2バイト目以降は回転したデータを格納する
for (uint8_t col = 0; col < 8; col++) { // 8列分のデータを処理
uint8_t rotatedByte = 0;
for (uint8_t row = 0; row < 8; row++) { // 8行分のデータを処理
if (fontData[row] & (1 << (7 - col))) { // 元データのビットを確認
rotatedByte |= (1 << row); // 回転後の位置にビットをセット
}
}
rotatedFontData[(charIndex - 1) * 9 + col + 1] = rotatedByte; // 回転したデータを格納
}
// MD_Parolaにフォントを登録
parola.addChar(charIndex, &rotatedFontData[(charIndex - 1) * 9]);
// フォントデータのインデックスを増加
messageCode[charIndex - 1] = charIndex;
charIndex++; // 次の文字のインデックスを増加
}
// 文字列の終端を設定
messageCode[charIndex - 1] = '\0';
}
// HTMLエスケープ文字をデコードする関数
void decodeHtmlEntities(String &text) {
text.replace("<", "<");
text.replace(">", ">");
text.replace("'", "'");
text.replace(""", "\"");
text.replace("&", "&");
text.replace(" ", " ");
}
// Core0はWiFi接続とニュースの取得を担当
void setup() {
Serial.begin(115200);
Serial.println();
Serial.println();
Serial.println();
for (uint8_t t = 4; t > 0; t--) {
Serial.printf("[SETUP] WAIT %d...\n", t);
Serial.flush();
delay(1000);
}
WiFi.mode(WIFI_STA);
WiFiMulti.addAP(ssid, pass);
#ifdef STASSID2
// 2つ目のアクセスポイント情報が定義されていればWiFi接続先としてWiFiMultiに追加
WiFiMulti.addAP(ssid2, pass2);
#endif
}
// Core1はニュースの表示を担当
void setup1() {
// MD_Parolaの初期化
parola.begin();
parola.displayClear();
// マトリクスに表示する初期メッセージ
const char* message = "ニュースを取得中...";
// フォントデータを登録
addFontToParola(message);
// メッセージを設定してスクロール開始
parola.displayScroll(messageCode, PA_LEFT, PA_SCROLL_LEFT, scrollSpeed);
}
// メインループ0 - ニュースの取得(通信処理)
void loop() {
// ニュースの文字列として読み取るタグを定義 (<title>...</title> の部分)
const static String startTag = "<title>";
const static String endTag = "</title>";
if ((WiFiMulti.run(timeout) == WL_CONNECTED)) {
HTTPClient https;
https.setInsecure();
if (https.begin(url)) {
int httpCode = https.GET();
if (httpCode == HTTP_CODE_OK) {
WiFiClient *stream = https.getStreamPtr();
String line;
std::vector<String> lines;
while (stream->available()) {
char c = stream->read();
line += c;
if (line.endsWith(startTag)) {
line = ""; // タイトル内容を収集するためにリセット
} else if (line.endsWith(endTag)) {
String title = line.substring(0, line.length() - endTag.length());
// HTMLエスケープ文字を変換
decodeHtmlEntities(title);
lines.push_back(title);
line = ""; // 次のデータを処理するためにリセット
}
if (line.length() > 1024) {
// 安全対策(メモリリーク防止)として、1行が長すぎる場合は最後のstartTag.length()分を保持してリセット
line = line.substring(line.length() - startTag.length());
}
}
// 新しいタイトルリストで更新
headlines = std::move(lines);
isUpdated = true;
} else {
Serial.printf("[HTTPS] GET... failed, error: %s\n", https.errorToString(httpCode).c_str());
}
// リソースを解放
https.end();
} else {
Serial.println("[HTTPS] Unable to connect");
}
} else {
Serial.println("[WIFI] Failed to connect to WiFi");
// WiFi接続に失敗した場合は少し待機して再接続を試みる
for (uint8_t t = 4; t > 0; t--) {
Serial.printf("[WIFI] WAIT %d...\n", t);
Serial.flush();
delay(1000);
}
return;
}
WiFi.disconnect(true);
Serial.println("Wait " + String(delayInterval / 1000) + " seconds before next round...");
Serial.printf("Free heap: %d\n", rp2040.getFreeHeap());
delay(delayInterval);
}
// メインループ1 - ニュースの表示(LEDマトリクス制御)
void loop1() {
// ニュースの見出しがスクロール完了したかどうかを示すフラグ
static bool isScrolled = false;
if (isUpdated) {
// ニュースの見出しが更新された場合、最初のメッセージから表示
isUpdated = false;
Serial.println("Headlines:");
for (const auto& headline : headlines) {
Serial.println(" - " + headline);
}
totalMessages = headlines.size();
messageIndex = 0; // 最初のメッセージから表示
}
// ニュースの見出しを順番に表示
if (isScrolled && totalMessages > 0) {
if (messageIndex >= totalMessages) {
messageIndex = 0; // 最初のメッセージに戻る
}
Serial.println("Displaying message " + String(messageIndex + 1) + " of " + String(totalMessages));
addFontToParola(headlines[messageIndex].c_str());
parola.displayScroll(messageCode, PA_LEFT, PA_SCROLL_LEFT, scrollSpeed);
messageIndex++;
}
// アニメーションを更新
if (isScrolled = parola.displayAnimate()) {
parola.displayReset();
// スクロールが完了したら待機する場合、以下のdelayで調整可能
// delay(1500);
}
}2コア使っており、Core0はニュース取得(WiFi通信部分)を担当し、Core1はニュース表示(LEDマトリクス表示部分)を担当しています。
10分間隔でニュースを取得し、取得した見出しをLEDマトリクスに順番にスクロール表示します。この間隔はdelayIntervalの値で調整できます。
見出しのスクロール速度は、scrollSpeedの値で調整できます。値が小さいほどスクロールが速くなります。
美咲フォントに存在しない文字は”□”になります。
ニュースサイトのURLはconst char *urlで定義します。yahoo!ニュース以外の主要ニュースサイトのurl定義をコメント化していますので、お好みでご使用ください。
your-ssid、your-passwordを接続先Wi-Fi(ご自宅のルーターなど)のSSIDとパスワードに書き換えてスケッチを書き込んでください。
OLEDニュースリーダー
OLEDを使ったニュースリーダーです。
ニュースサイト(Yahoo!ニュースなど)のRSSを読み取り、見出しをOLEDに表示します。
透過OLEDでも表示してみました。
OLEDの配線について
| OLED(I2C) | ピン/GPIO | 備考 |
|---|---|---|
| GND | GND | |
| VCC | 3.3V | |
| SCL | 5 | I2C SCL デフォルト |
| SDA | 4 | I2C SDA デフォルト |
スケッチ
Arduino IDEのライブラリマネージャーから検索してインストールできます。
#include <WiFi.h>
#include <HTTPClient.h>
#include <Wire.h>
#include <U8g2lib.h>
// WiFiアクセスポイント情報
#define STASSID "your-ssid"
#define STAPSK "your-password"
// WiFiアクセスポイント情報2 (WiFi接続を複数アクセスポイントに対して試みる場合に使用します。)
// #define STASSID2 "your-ssid"
// #define STAPSK2 "your-password"
const char *ssid = STASSID;
const char *pass = STAPSK;
#ifdef STASSID2
const char *ssid2 = STASSID2;
const char *pass2 = STAPSK2;
#endif
WiFiMulti WiFiMulti;
//Yahooニュース
const char *url = "https://news.yahoo.co.jp/rss/topics/top-picks.xml";
//NHKニュース
// const char *url = "https://www3.nhk.or.jp/rss/news/cat0.xml";
//ITmedia
// const char *url = "https://rss.itmedia.co.jp/rss/2.0/news_bursts.xml";
//Googleニュース
// const char *url = "https://news.google.com/rss/search?q=Japan&hl=ja&gl=JP&ceid=JP:ja";
U8G2_SSD1306_128X64_NONAME_F_HW_I2C u8g2(U8G2_R0, /* reset=*/ U8X8_PIN_NONE);
// ニュースの見出しを格納する動的配列
std::vector<String> headlines;
// headlinesの更新フラグ
volatile bool isUpdated = false;
// WiFi接続のタイムアウト時間 (ミリ秒)
const uint32_t timeout = 20000; // 20秒
// RSS読み込みの間隔 (ミリ秒)
const uint32_t delayInterval = 10 * 60 * 1000; // 10分(600000ミリ秒)
// OLEDに表示するメッセージ関連の変数
const int SCROLL_STEP = 2; // スクロールのステップ幅 (ピクセル単位)
// HTMLエスケープ文字をデコードする関数
void decodeHtmlEntities(String &text) {
text.replace("<", "<");
text.replace(">", ">");
text.replace("'", "'");
text.replace(""", "\"");
text.replace("&", "&");
text.replace(" ", " ");
}
// Core0はWiFi接続とニュースの取得を担当
void setup() {
Serial.begin(115200);
Serial.println();
Serial.println();
Serial.println();
for (uint8_t t = 4; t > 0; t--) {
Serial.printf("[SETUP] WAIT %d...\n", t);
Serial.flush();
delay(1000);
}
WiFi.mode(WIFI_STA);
WiFiMulti.addAP(ssid, pass);
#ifdef STASSID2
// 2つ目のアクセスポイント情報が定義されていればWiFi接続先としてWiFiMultiに追加
WiFiMulti.addAP(ssid2, pass2);
#endif
}
// Core1はニュースの表示を担当
void setup1() {
Wire.begin();
Wire.setClock(400000); // I2Cクロックを400kHzに設定
u8g2.begin();
u8g2.enableUTF8Print(); // UTF-8サポートを有効にする
u8g2.setFont(u8g2_font_b16_b_t_japanese3); // 日本語フォントを設定
// 初期メッセージ
headlines.push_back("ニュースを取得中...");
}
// メインループ0 - ニュースの取得(通信処理)
void loop() {
// ニュースの文字列として読み取るタグを定義 (<title>...</title> の部分)
const static String startTag = "<title>";
const static String endTag = "</title>";
if ((WiFiMulti.run(timeout) == WL_CONNECTED)) {
HTTPClient https;
https.setInsecure();
if (https.begin(url)) {
int httpCode = https.GET();
if (httpCode == HTTP_CODE_OK) {
WiFiClient *stream = https.getStreamPtr();
String line;
std::vector<String> lines;
while (stream->available()) {
char c = stream->read();
line += c;
if (line.endsWith(startTag)) {
line = ""; // タイトル内容を収集するためにリセット
} else if (line.endsWith(endTag)) {
String title = line.substring(0, line.length() - endTag.length());
// HTMLエスケープ文字を変換
decodeHtmlEntities(title);
lines.push_back(title);
line = ""; // 次のデータを処理するためにリセット
}
if (line.length() > 1024) {
// 安全対策(メモリリーク防止)として、1行が長すぎる場合は最後のstartTag.length()分を保持してリセット
line = line.substring(line.length() - startTag.length());
}
}
// 新しいタイトルリストで更新
headlines = std::move(lines);
isUpdated = true;
} else {
Serial.printf("[HTTPS] GET... failed, error: %s\n", https.errorToString(httpCode).c_str());
}
// リソースを解放
https.end();
} else {
Serial.println("[HTTPS] Unable to connect");
}
} else {
Serial.println("[WIFI] Failed to connect to WiFi");
// WiFi接続に失敗した場合は少し待機して再接続を試みる
for (uint8_t t = 4; t > 0; t--) {
Serial.printf("[WIFI] WAIT %d...\n", t);
Serial.flush();
delay(1000);
}
return;
}
WiFi.disconnect(true);
Serial.println("Wait " + String(delayInterval / 1000) + " seconds before next round...");
Serial.printf("Free heap: %d\n", rp2040.getFreeHeap());
delay(delayInterval);
}
// メインループ1 - ニュースの表示(OLED制御)
void loop1() {
static int messageIndex = 0; // 現在表示しているメッセージのインデックス
static size_t totalMessages = headlines.size(); // メッセージの総数
static int textPosition = 128; // 初期位置をディスプレイの右端に設定
static int textWidth = 0;
static String currentMessage = "";
// ニュースの見出しがスクロール完了したかどうかを示すフラグ
static bool isScrolled = true;
// ニュースの見出しを表示するメッセージが変更された場合、表示位置と幅をリセット
if (isScrolled) {
if (isUpdated) {
// ニュースの見出しが更新された場合、最初のメッセージから表示
isUpdated = false;
Serial.println("Headlines:");
for (const auto& headline : headlines) {
Serial.println(" - " + headline);
}
totalMessages = headlines.size();
messageIndex = 0; // 最初のメッセージから表示
}
if(totalMessages == 0) {
headlines.push_back("ニュースがありません");
totalMessages = headlines.size();
messageIndex = 0; // 最初のメッセージから表示
}
Serial.println("Displaying message " + String(messageIndex + 1) + " of " + String(totalMessages));
// スクロール中のメッセージを設定
isScrolled = false; // スクロール中に設定
currentMessage = headlines[messageIndex]; // 現在のメッセージを取得
textWidth = u8g2.getUTF8Width(currentMessage.c_str()); // テキストの幅を取得
textPosition = 128; // テキストの初期位置を右端に
// 次のメッセージに進む
if (++messageIndex >= totalMessages) {
messageIndex = 0; // メッセージの最後まで行ったら最初のメッセージに戻る
}
}
// ニュースの見出しをスクロール表示
if(!isScrolled) {
u8g2.clearBuffer(); // バッファをクリア
// テキストが完全にスクロールしたかどうかをチェック
if (textPosition < -textWidth) {
isScrolled = true; // スクロール完了
} else {
u8g2.drawUTF8(textPosition, 16 - 2, currentMessage.c_str()); // テキストを描画
}
u8g2.sendBuffer(); // バッファをディスプレイに送信
textPosition -= SCROLL_STEP; // テキストを左に移動
}
}2コア使っており、Core0はニュース取得(WiFi通信部分)を担当し、Core1はニュース表示(OLED表示部分)を担当しています。
10分間隔でニュースを取得し、取得した見出しをLEDマトリクスに順番にスクロール表示します。この間隔はdelayIntervalの値で調整できます。
見出しのスクロールは、SCROLL_STEPの値で調整できます。値が小さいほどスクロールが滑らかになります。
ニュースサイトのURLはconst char *urlで定義します。yahoo!ニュース以外の主要ニュースサイトのurl定義をコメント化していますので、お好みでご使用ください。
your-ssid、your-passwordを接続先Wi-Fi(ご自宅のルーターなど)のSSIDとパスワードに書き換えてスケッチを書き込んでください。
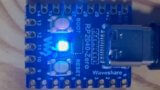
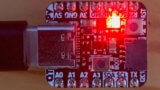
シャッターリモコンを使う (Bluetooth使用例)
100円ショップで販売されているシャッターリモコン(BLE HIDペリフェラル)を使って、ボタン操作でLEDが光るスケッチを紹介します。
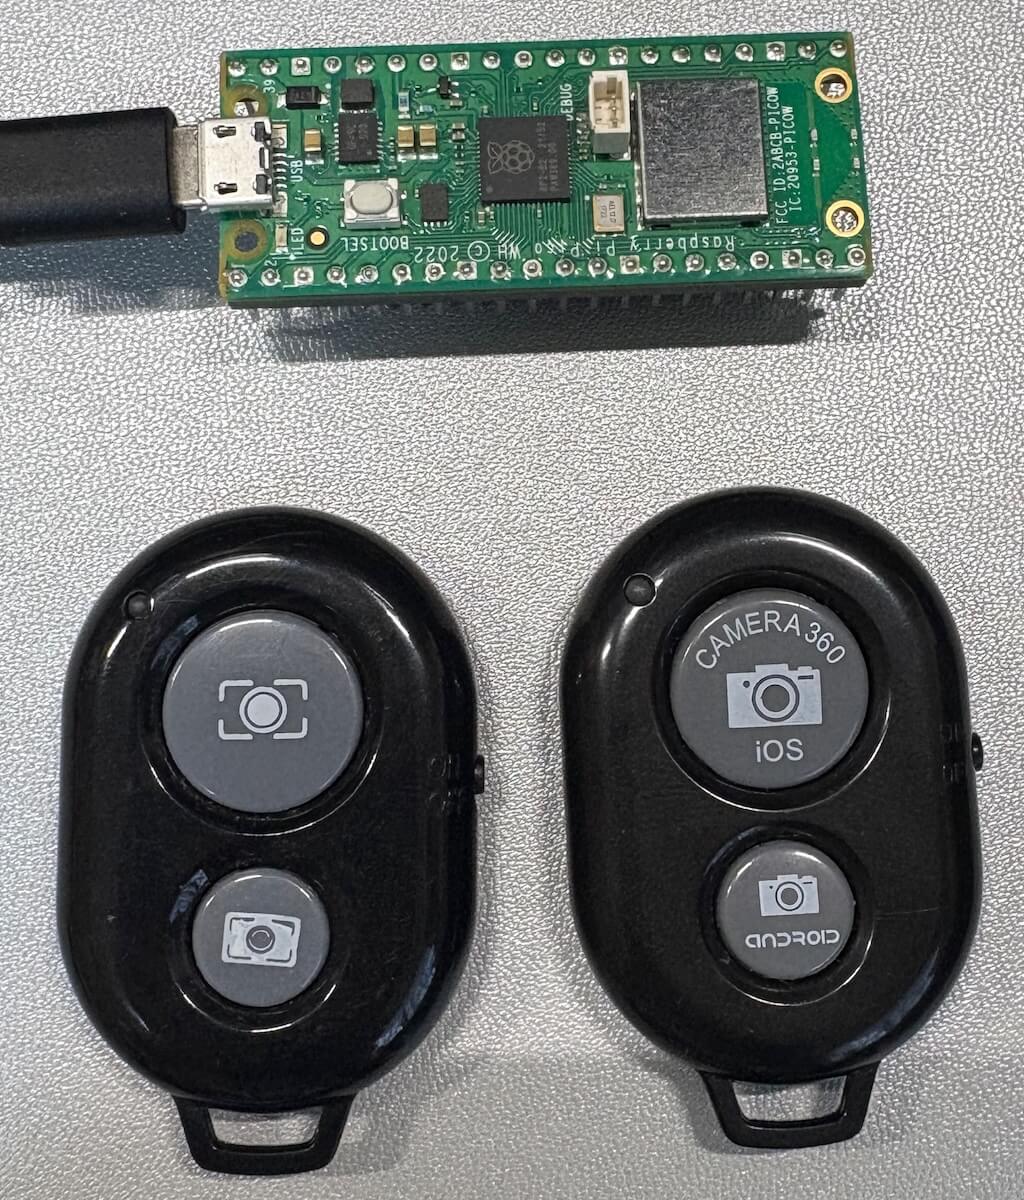
写真のリモコンは、左が ダイソー、右が ワッツ で購入したものです。
ちなみにダイソーのタイプはすでに終売で、ワッツのタイプはキャンドゥでも販売されています。
面白いことに、この2つのリモコンは挙動が異なります。
- ダイソーのリモコン ボタンを押したときと離したときの両方でイベントが発生します。 → ボタンを押している間だけLEDが点灯します。
- ワッツのリモコン ボタンを押したときはイベントが発生せず、離したときだけイベントが発生します。 → 押すたび(厳密には離したタイミング)にLEDが点いたり消えたりを繰り返します。
シンプルですが、動作の違いを比較するとちょっと面白いですね。
#include <BluetoothHIDMaster.h>
BluetoothHIDMaster hid;
// Pico W 内蔵LEDのピン
#define LED_PIN LED_BUILTIN
// Pico WのLEDの状態(HIGH/LOW)を保持する変数
uint32_t ledState;
void setup() {
ledState = LOW;
pinMode(LED_PIN, OUTPUT);
digitalWrite(LED_PIN, ledState); // 初期状態でLEDを消灯
Serial.begin(115200);
delay(3000); // 起動準備待機
Serial.println("Starting BLE HID master, put your device in pairing mode now.");
// HIDイベントハンドラを設定
// シャッターリモコンはConsumer Keyを送信する
hid.onConsumerKeyDown(ckb, (void *)true);
hid.onConsumerKeyUp(ckb, (void *)false);
// HIDマスターモードを開始
hid.begin(true); // BLEモードで開始
do {
hid.connectBLE();
} while (!hid.connected());
}
void loop() {
// Pico WのBOOTSELボタンを押した場合、再接続を試みる
if (BOOTSEL) {
while (BOOTSEL) {
delay(1);
}
hid.disconnect();
hid.clearPairing();
Serial.printf("Restarting HID master, put your device in pairing mode now.\n");
do {
hid.connectBLE();
} while (!hid.connected());
}
}
// シャッターリモコン ボタン押下時のコールバック関数
void ckb(void *cbdata, int key) {
bool state = (bool)cbdata;
Serial.printf("Consumer: %02x %s\n", key, state ? "DOWN" : "UP");
ledState = !ledState; // LEDの状態をトグル
digitalWrite(LED_PIN, ledState); // LEDの状態をトグル
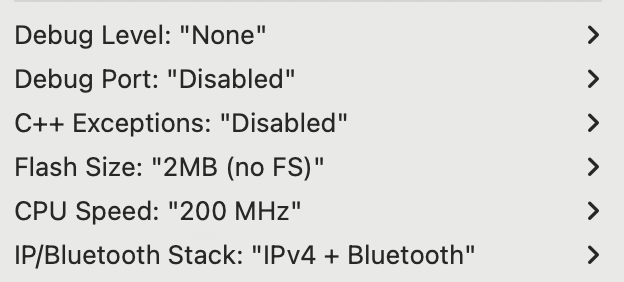
}[ツール]→ IP/Bluetooth Stack: を “IPv4 + Bluetooth” に設定してください。
Bluetooth接続の実装には、BluetoothHIDMasterクラスを使用します。
このクラスはPico W/Pico 2 Wのボードに標準で用意されており、追加のライブラリを導入しなくても利用できます。
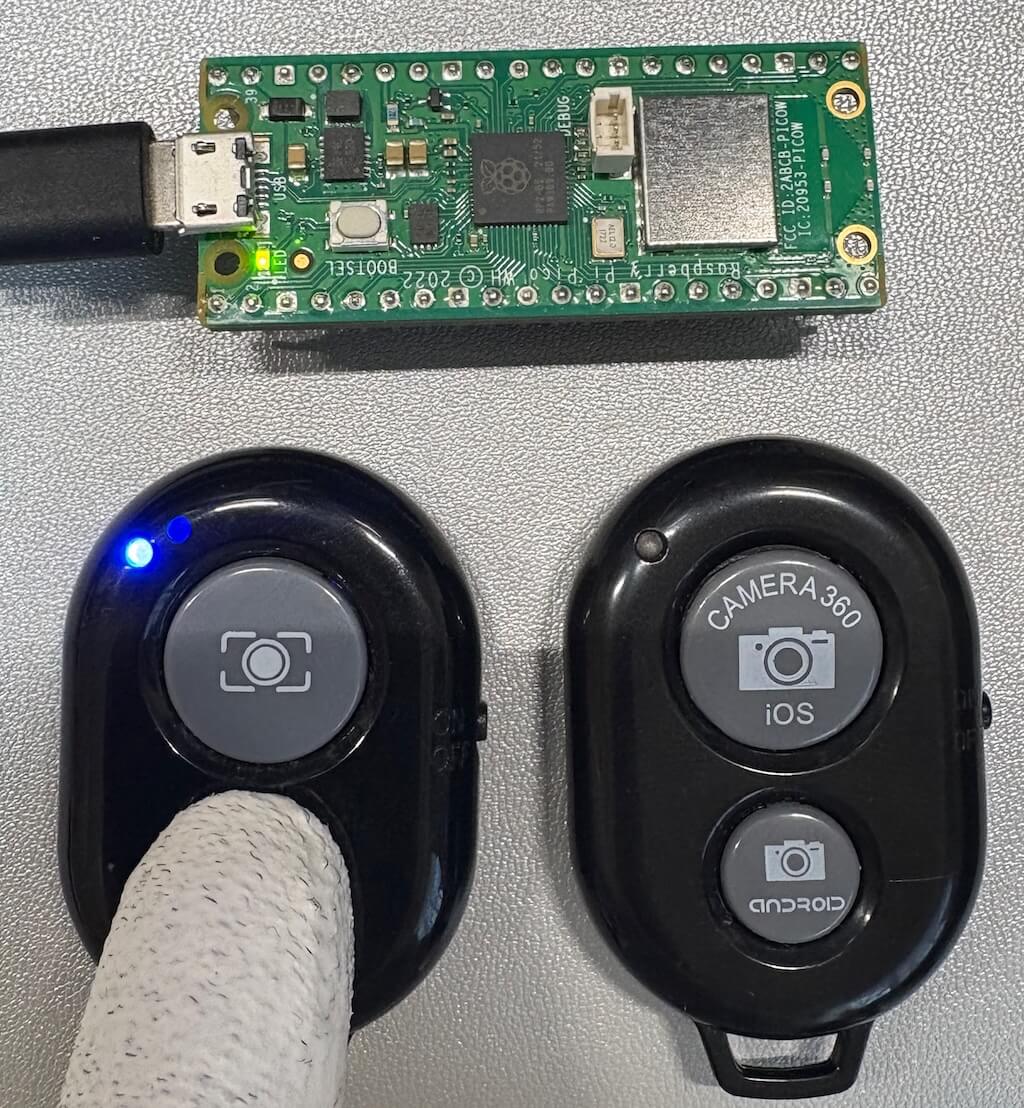
シリアルモニターにて動作の流れが確認できます。
シャッターリモコンのペアリングが始まると、BLEで接続されます。
接続が完了すると、シャッターリモコン側のLEDは消灯します。
シャッターリモコンのボタンを押すと、LEDが点灯/消灯します。
Pico W/Pico 2 WのBOOTSELボタンを押すと、いま接続されているBLEペアリングが解除されます。
その後は自動的に再接続待ち(アドバタイズ状態)に戻るため、接続が切れたときや別の機器と再接続したいときに活用できます。
サンプルプログラム (MicroPython)
MicroPythonのファームウェアインストールについては次の記事を参考にしてください。
OLEDクロック
OLED(I2C)を使った時計です。
Wi-Fiを通してNTPで時刻合わせを行うように実装しています。
MicroPython版はシンプルにssd1306ライブラリの標準フォントで表示しています。

OLEDの配線について
| OLED(I2C) | ピン/GPIO | 備考 |
|---|---|---|
| GND | GND | |
| VCC | 3.3V | |
| SCL | 5 | I2C SCL デフォルト |
| SDA | 4 | I2C SDA デフォルト |
from machine import I2C
import ssd1306
import ntptime
import time
import network

# WiFi接続情報
SSID = "your-ssid"
PASSWORD = "your-password"

# 画面サイズ
WIDTH = 128
HEIGHT = 64

# I2C設定とOLED初期化
i2c = I2C(0)
oled = ssd1306.SSD1306_I2C(WIDTH, HEIGHT, i2c)

# 任意のNTPサーバー設定 (time.google.com)
ntptime.host = "time.google.com"


# 自動改行をする関数
def textln(text, x, y):
    # 1行の文字数(画面幅に合わせて設定)
    max_line_length = WIDTH // 8  # 1文字あたり8ピクセルとして計算
    lines = []  # 改行された文字列を保持

    # 文字列を最大行数で分割
    for i in range(0, len(text), max_line_length):
        lines.append(text[i : i + max_line_length])

    # 各行を表示
    for i, line in enumerate(lines):
        oled.text(line, x, y + i * 8)  # 8ピクセル(文字の高さ)ごとに改行


# WiFi接続
def connect_wifi():
    wlan = network.WLAN(network.STA_IF)
    wlan.active(True)
    wlan.connect(SSID, PASSWORD)

    oled.fill(0)  # 画面をクリア
    textln("WiFi connecting...", 0, 10)
    oled.show()

    for _ in range(10):  # 10秒以内に接続できなければ失敗
        if wlan.isconnected():
            oled.fill(0)  # 画面をクリア
            textln("WiFi connected!", 0, 10)
            oled.show()
            return wlan
        time.sleep(1)

    oled.fill(0)  # 画面をクリア
    textln("WiFi Failed", 0, 10)
    oled.show()
    return None


# NTPによる時刻同期
def sync_time():
    try:
        ntptime.settime()
    except:
        oled.fill(0)
        textln("Failed to sync time", 0, 0)
        oled.show()
        raise


# 日本時刻の取得
def get_jst_time():
    t = time.localtime(time.time() + 9 * 60 * 60)  # JST: UTC + 9時間
    return t


# 時刻をフォーマットしてOLEDに描画
def display_time():
    now = get_jst_time()
    hour, minute, second = now[3], now[4], now[5]
    year, month, day, weekday = now[0], now[1], now[2], now[6]
    weekdays = ["Mon", "Tue", "Wed", "Thu", "Fri", "Sat", "Sun"]

    oled.fill(0)
    # 年月日(曜日)の描画
    oled.text(f"{year}-{month:02}-{day:02} ({weekdays[weekday]})", 0, 20)
    # 時分秒の描画
    oled.text(f"{hour:02}:{minute:02}:{second:02}", 0, 30)
    oled.show()


# メイン処理
def main():
    if not (wlan := connect_wifi()):
        return

    try:
        sync_time()
    except:
        return
    finally:
        if wlan.isconnected():
            wlan.disconnect()

    last_sec = -1  # 秒が変わるまで待つための記録

    while True:
        now = get_jst_time()
        current_sec = now[5]  # 現在の秒

        if current_sec != last_sec:
            # 秒が変わった場合のみOLEDに描画
            last_sec = current_sec
            display_time()

        time.sleep(0)


main()
your-ssid、your-passwordを接続先Wi-Fi(ご自宅のルーターなど)のSSIDとパスワードに書き換えてください。
関連記事
当ブログのマイコン記事です。ぜひご覧ください。


https://aloseed.com/it/raspberry-pi-pico-w/


コメント